How to Add Custom Domain to Your E-commerce Website in Franpos
Introduction
This is the first guide in a series on how to use and configure websites in Franpos. In this guide, you'll find a step-by-step walkthrough on how to add custom (owned) domain to your e-commerce website.
Understanding the Basics
Before getting started, review the terminology presented in the illustration above.
Each URL consists of a domain name and a domain zone, and may optionally include a sub-domain. For example: www.franpos.com
 This is used as a demonstration and may vary in your case.
A subdomain is not required but can be used if desired.
A subdomain can take various forms —
www is not the only option. It can also be shop, store, bit, and so on. You can configure hosting either with or without a subdomain. Below, we’ll cover both options.
Option 1: Adding a Domain Without a Sub-domain
Step 1: Enter Your Domain
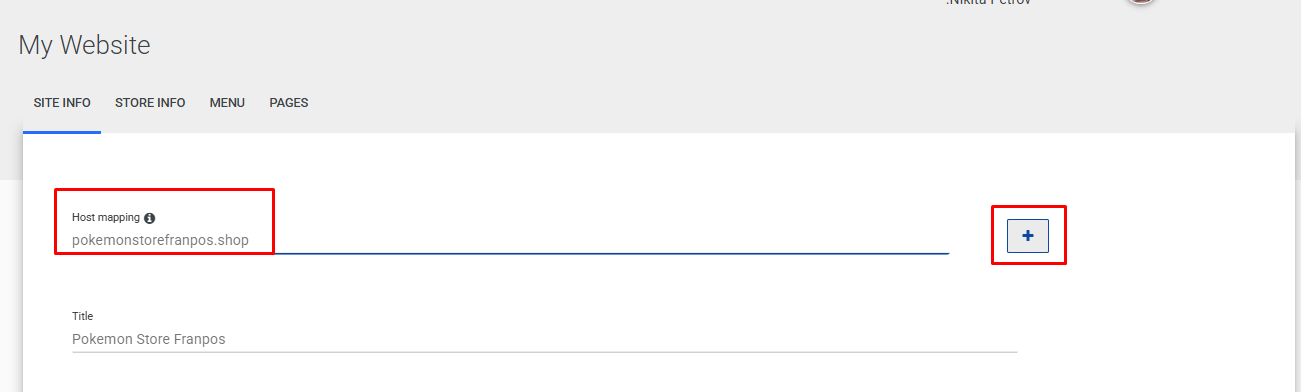
Enter your domain in the corresponding input field. In our can: pokemonstorefranpos.shop
Click the plus button to continue.
Step 2: Confirm Domain Is Added
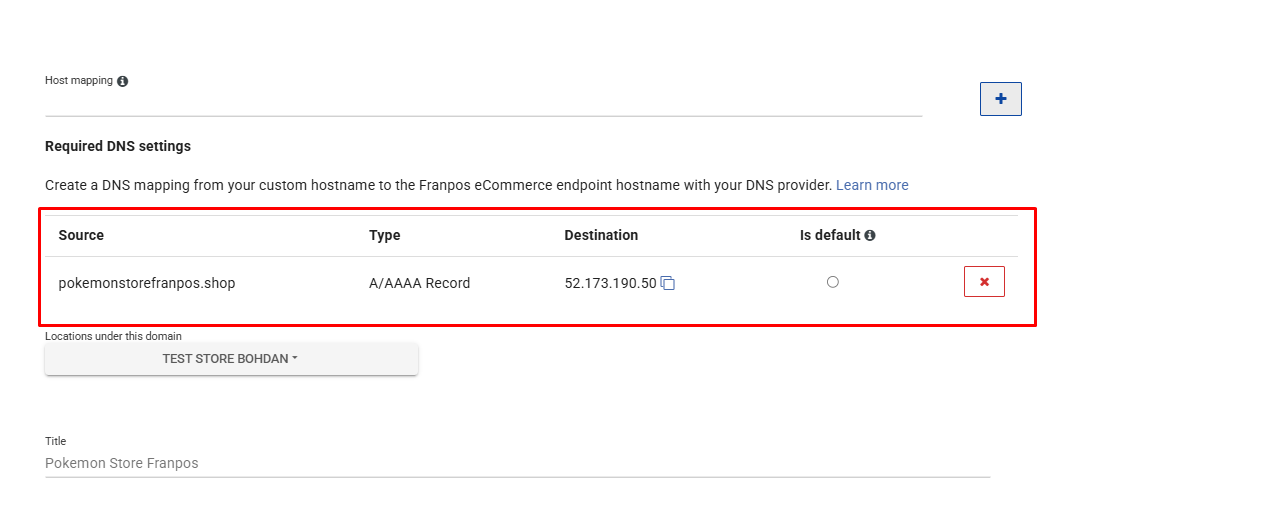
Your domain will appear in the list as added.
Step 3: Configure DNS Mapping

You will now need to create a DNS mapping with your domain hosting provider.
In our example, we’re using GoDaddy.
1.Log in to your GoDaddy account.
2.Navigate to your domain settings.
3.Click on the Domain tab and then open the DNS section.
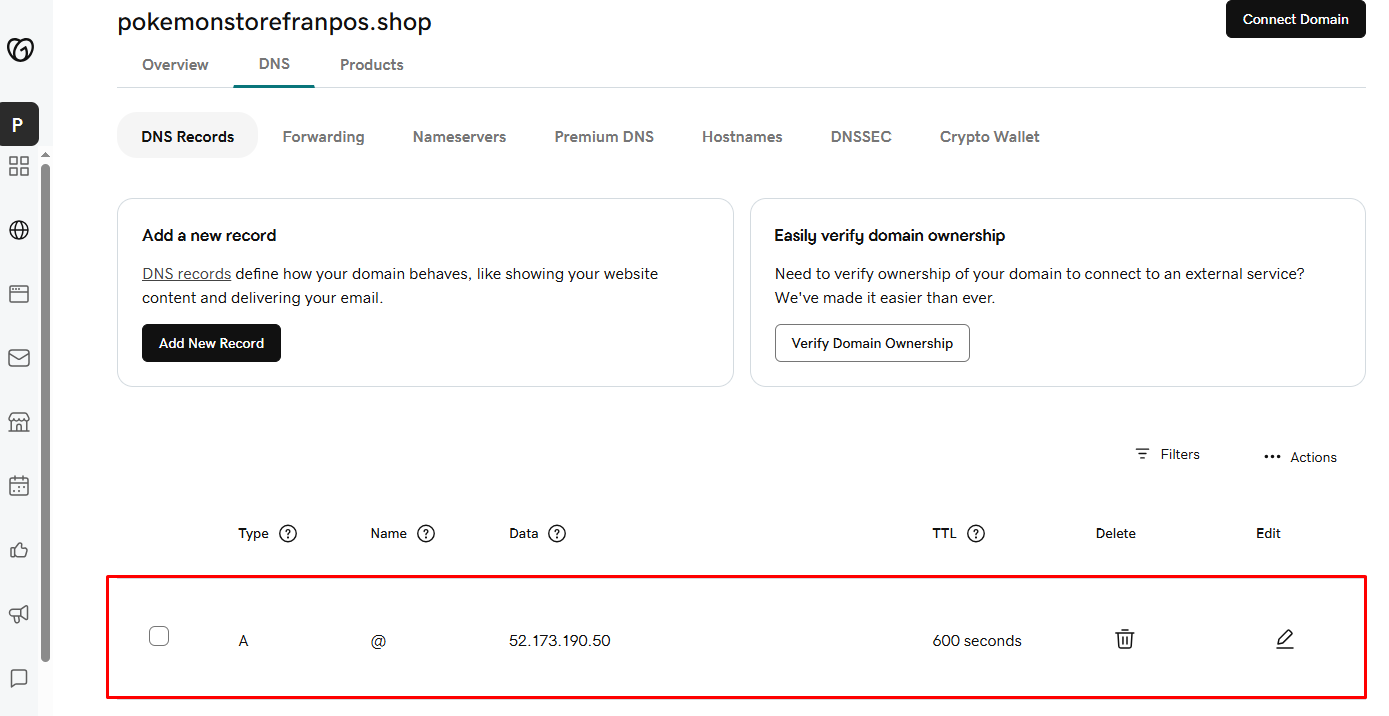
Step 4: Add a New A Record or modify the existing one
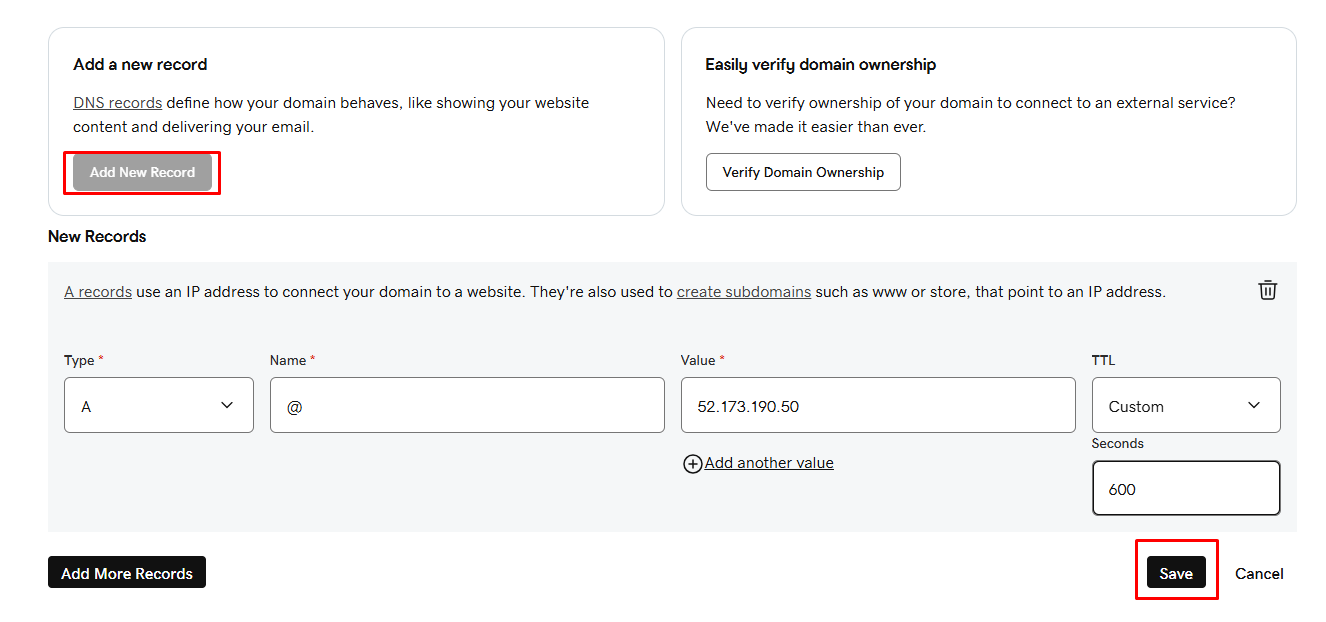
Click Add New Record and input the following information:
 Type:
Type: A
Name: @Value: (Copy from your Franpos back office)
TTL:
Custom, 600 seconds
(This defines how often your DNS updates. 600 seconds is the fastest option.)Click Save to apply the changes.
Step 5: Wait for Propagation
It may take up to 15 minutes for your DNS configuration to propagate, depending on the hosting provider.
Step 6: Save in Franpos Back Office
Return to Franpos and click Save to finalize domain linking.
Option 2: Adding a Domain With a Sub-domain
Step 1: Enter Full URL with Subdomain
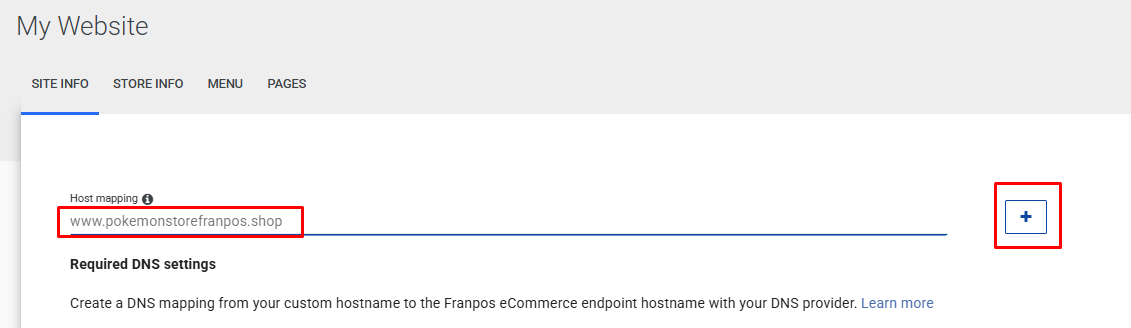
Enter the full domain including subdomain. For example: www.pokemonstorefranpos.shop
Click the plus button to proceed.
Step 2: Confirm Domain Is Added
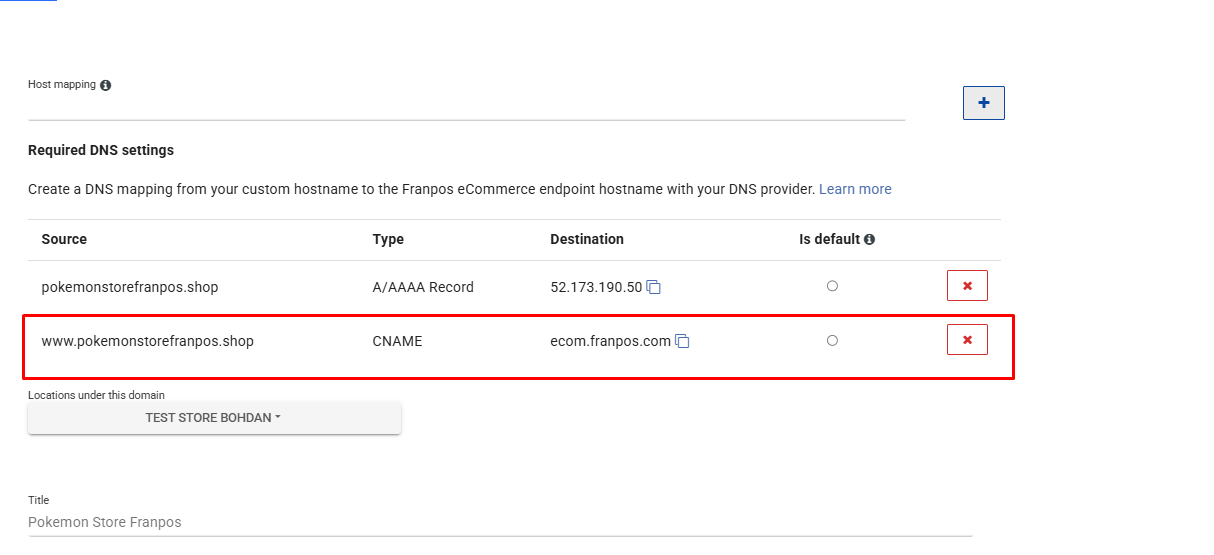
Your subdomain will appear in the list as added.
Step 3: Configure DNS Mapping
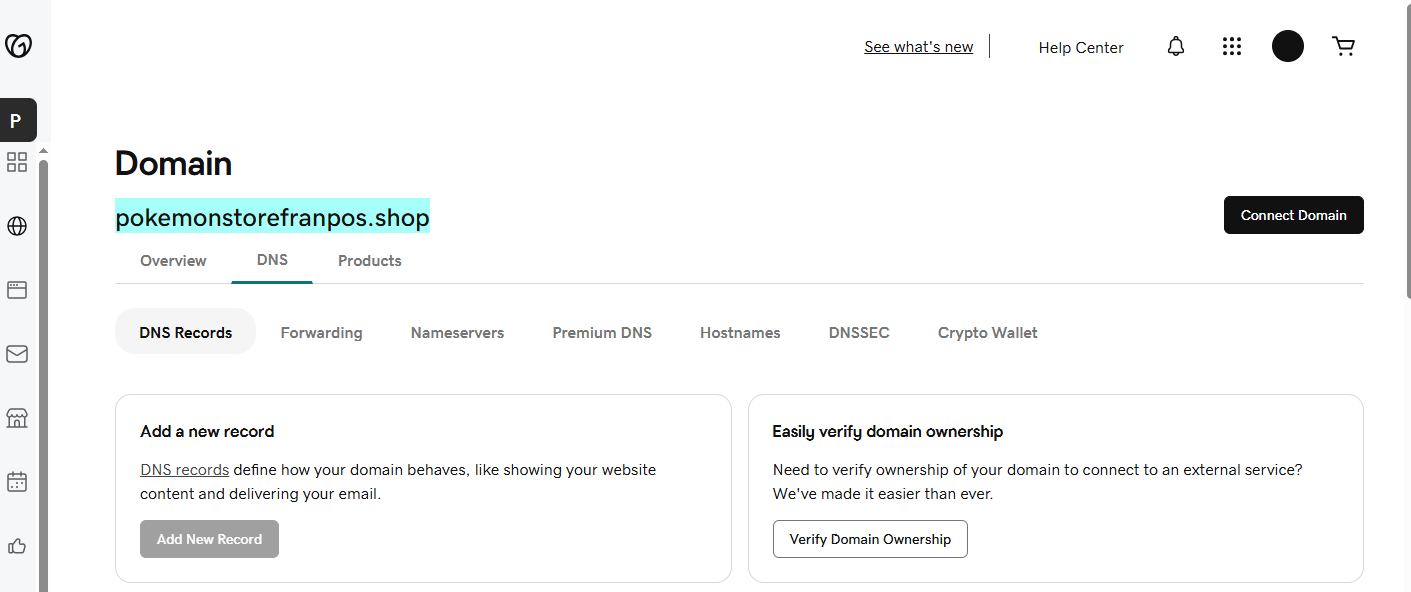
1. Log in to your GoDaddy account.
2. Navigate to your domain settings.
3. Click on the Domain tab and then open the DNS section.
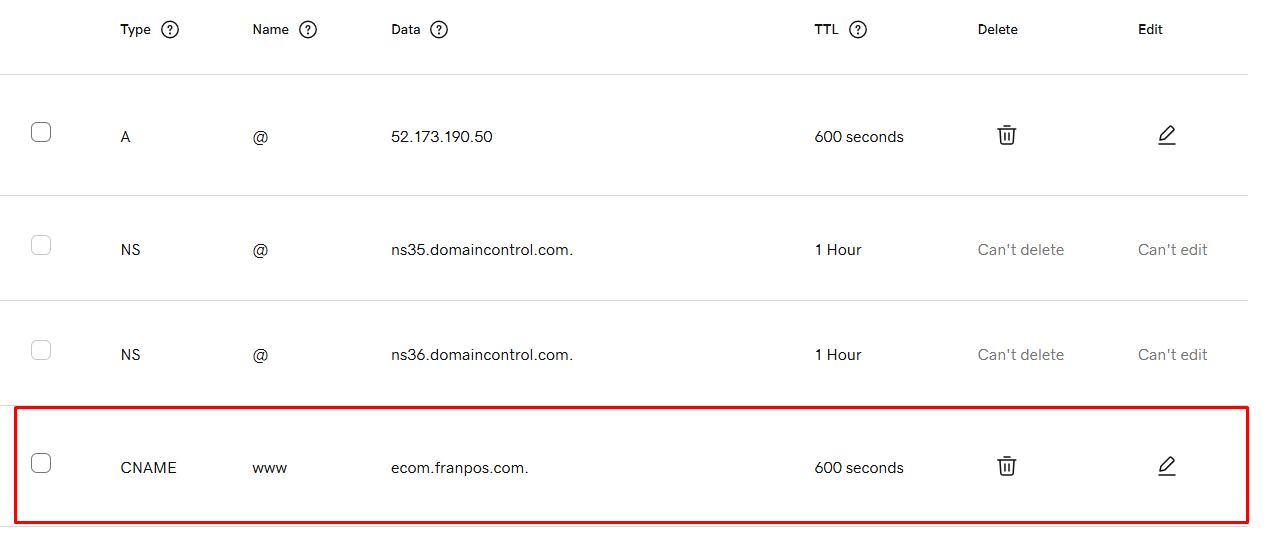
Step 4: Add a New CNAME Record or modify the existing one
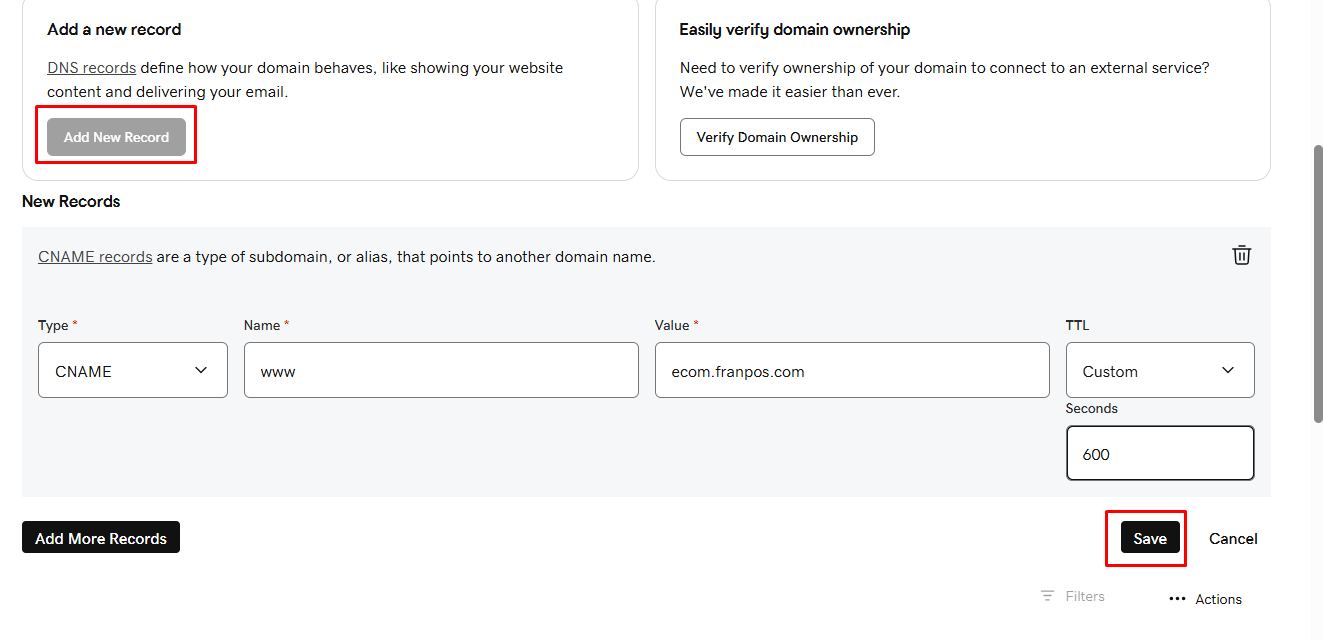
Click Add New Record and enter the following:
Type: CNAME
Name: www
(sub-domain could be deferent, as in example: shop,store,bit)
Value: ecom.franpos.com
TTL: Custom, 600 seconds
(This defines how often your DNS updates. 600 seconds is the fastest option.)
Click Save to apply the changes.
Step 5: Wait for Propagation
As with A records, allow up to 15 minutes for changes to take effect.
Step 6: Save in Franpos Back Office
Return to Franpos and click Save to complete the setup.
Why You Should Add a www(sub-domain) DNS Record
Adding a www DNS record for your domain (e.g., www.example.com) is a recommended best practice. This configuration improves compatibility, aligns with user behavior, and helps with SEO optimization. Here are the key reasons why:
1. User Expectations and Typing Habits
Many users instinctively type www. before a domain name:
For example, they may enter
www.example.cominstead ofexample.com.
If your site is only configured to respond to the non-www version, users might encounter errors or be redirected incorrectly.
Solution: Ensure that both versions of the domain (with and without www) resolve correctly through DNS.
2. Canonical Domain and SEO Consistency
Search engines may treat www.example.com and example.com as separate websites if not configured properly. This can lead to:
- Duplicate content penalties
- Lower search rankings
- Fragmented analytics data
Best Practice: Choose a canonical domain and redirect the other version to it. For example:
- Redirect www.example.com → example.com, or
- Redirect example.com → www.example.com
Both domains must be configured in DNS to support redirects and ensure consistent traffic handling.
How to Set a Primary URL and Enable Redirects
In the Franpos Back Office, you can designate one of your added domain URLs as the primary. This determines the default link your customers will be redirected to, regardless of which version of the domain they initially enter.
Setting the Primary Domain
To configure the primary domain:
1.Go to the Settings - My Website section in the Franpos Back Office.
2.Locate the list of added URLs.
3.Check the field Is default next to the domain you want to make the primary.Once selected, Franpos will automatically redirect all other configured domains to this one.
For example:
If a customer visits pokemonstorefranpos.shop , but www.pokemonstorefranpos.shop is set as the primary, they will be redirected towww.pokemonstorefranpos.shopautomatically.
Common Issues and Troubleshooting
Here are some frequent issues users may encounter when setting up a domain, along with solutions:
1. Save Button Not Working in the Back Office
Issue: You cannot save your domain settings.
Solution:
Make sure a Website Title is selected.
This field is required and must be filled out before saving any changes.
2. Conflict with Existing DNS Records
Issue: You receive an error or the domain doesn’t work after setting up DNS.
Solution:
If a DNS record already exists:
-For the A record type with name @ (used in the "no subdomain" option), edit the existing record instead of adding a new one.
-For the CNAME type with name www (used when using a subdomain), also edit the existing record rather than duplicating it.
3. Delayed DNS Updates Due to High TTL
Issue: Your domain changes in the back office don’t take effect immediately.
Solution:
If the domain was previously used and had a high TTL (Time To Live) value set (e.g., 24–48 hours), you’ll need to wait for that period to expire before the changes take effect.
Example: If your old TTL was set to 1–2 days, the system may not allow a successful update or redirect until that time has passed.
Related Articles
My Website Guidance "Redirects" Page
Introduction This guide is the sixth installment in our Franpos website series. It provides detailed instructions on how to configure URL redirections within the Redirects page found under the My Website section. Following this walkthrough will help ...My Website Guidance "Menu" Page
Creating and managing menu buttons on your Website Introduction This is the fourth guide in a series on how to use and configure websites within Franpos. In this article, you’ll learn how to create menu buttons that allow your customers to interact ...My Website Guidance "Pages" Page
Creating and Managing Pages on Your Website Introduction This is the fifth guide in a series on how to use and configure websites within Franpos. In this article, you'll learn how to create custom pages for your website using the My Website > Pages ...My Website Guidance "Store Info" Page
Introduction This is the third guide in our series on using and configuring websites within Franpos. In this walkthrough, we’ll provide clear, step-by-step instructions on how to set up and manage the "Store Info" page, located under the My Website ...My Website Guidance "Site Info" Page
Introduction This is the second guide in a series on how to use and configure websites within Franpos. In this walkthrough, you’ll find step-by-step instructions on how to work with the "Site Info" page inside the My Website section. Parent and Child ...