My Website Guidance "Menu" Page
Creating and managing menu buttons on your Website
Introduction
This is the fourth guide in a series on how to use and configure websites within Franpos. In this article, you’ll learn how to create menu buttons that allow your customers to interact with your website. You’ll also discover how to reassign their destination and change their placement.
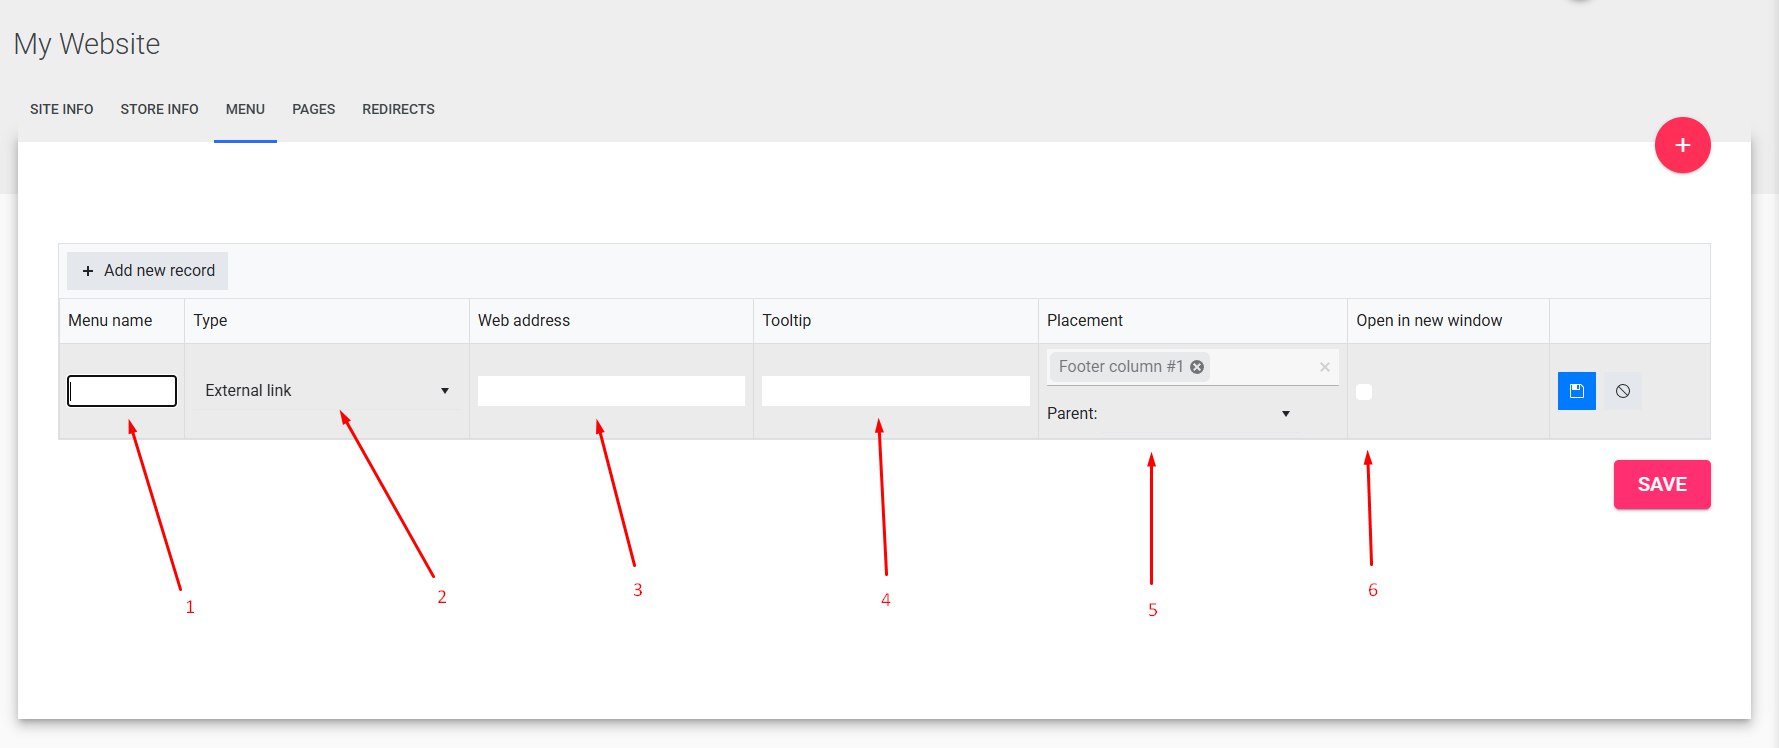
Menu Settings
When adding a menu button, you'll see several important settings:
- Menu Name – The name of the button that will appear on your website. You can name it anything you like. Also, if you don’t like the standard name of your button—for example, if you want to change the Booking button to Book Now!—you can do this by creating a new button with a custom name 'Book Now!' and assigning the Booking type to that button.
- Type – Sets the initial behavior of the button. For example, if you select Categories, clicking the button will open the Categories page by default.
- Web Address – Determines where the button will direct users. For example, you can set the 'Type' to "Products" and enter "Categories" in the 'Web Address' field. This way, the original button type (Products) will redirect to the Categories page.
- Tooltip – A short message that appears when users hover over the button. Useful for adding helpful hints or context.
- Placement – Controls where the button appears or applies on your website. Parent is used for creating a dropdown menu.
- Open in New Window – If enabled, the linked page will open in a new browser tab or window.
 Example
ExampleMenu Types Overview
Example
Custom and Utility Types
- External Link – Allows you to insert any URL into the
Web Addressfield to link to an external page (e.g., YouTube, another site). - Content Page – Used to link to custom pages not listed in the default types (e.g., Rewards, About Us).
- No Link – Creates a non-functional placeholder button that can be used as a dropdown menu header.
- Astro offers - Adds a button with Astro Offers for your store. Astro integration is required for this button type to appear.
No link type + Parent selected for 'Our team' and 'Our story' buttons
Astro type:

Predefined System Pages
These types automatically link your button to specific default pages on your website:
| Type | Function |
|---|---|
| Products | Links to the Products page (opens with the first category displayed). |
| Booking | Links to the Booking page (only if Online Booking is enabled). |
| Check-in | Links to the Check-In / Walk-In page (requires Walk-In to be enabled). |
| Brands | Links to the Brands page. |
| Categories | Links to the Categories page. |
Web Address Column
Button Placement Options
As mentioned earlier, the Placement setting defines where the button appears on the website. Additionally, if the selected placement already exists on the site, it determines what element the button will be linked to. For example, if you choose "Logo" as the placement, clicking the logo on the website will redirect users to the destination specified in the Web Address field.
Location search example
| Placement | Description |
|---|---|
| Header | The top section of the website where all main menu buttons are displayed. |
| Footer 1 | The primary footer area at the bottom of the website. |
| Footer 2 | A secondary footer area located just below Footer 1. |
| Logo | Redirects users when they click the company logo (usually top-left corner). |
|
Location search
|
Creates a button that is only applicable for multi-location setups. When a customer searches for the nearest location, this button will appear within the location results.
|
| Receipt screen | Displays the button as a link on the customer’s online receipt screen. |
Related Articles
My Website Guidance "Redirects" Page
Introduction This guide is the sixth installment in our Franpos website series. It provides detailed instructions on how to configure URL redirections within the Redirects page found under the My Website section. Following this walkthrough will help ...My Website Guidance "Pages" Page
Creating and Managing Pages on Your Website Introduction This is the fifth guide in a series on how to use and configure websites within Franpos. In this article, you'll learn how to create custom pages for your website using the My Website > Pages ...My Website Guidance "Store Info" Page
Introduction This is the third guide in our series on using and configuring websites within Franpos. In this walkthrough, we’ll provide clear, step-by-step instructions on how to set up and manage the "Store Info" page, located under the My Website ...My Website Guidance "Site Info" Page
Introduction This is the second guide in a series on how to use and configure websites within Franpos. In this walkthrough, you’ll find step-by-step instructions on how to work with the "Site Info" page inside the My Website section. Parent and Child ...How to Add Custom Domain to Your E-commerce Website in Franpos
Introduction This is the first guide in a series on how to use and configure websites in Franpos. In this guide, you'll find a step-by-step walkthrough on how to add custom (owned) domain to your e-commerce website. Understanding the Basics Before ...